See how to repair and replace your rod’s tip top whether at home, or on the water!
How to Repair a Tip Top on Your Fishing Rod
There’s a law out there that says anything that can happen to your rod’s tip top will happen—or something like that. The point is, accidents happen, especially with fishing equipment, and especially on the water.
Learning to repair the tip of your rod on the go could save a favorite rod, a fishing trip, or even a tournament paycheck!
First we will cover some tips to remove the old tip top, if the car door didn’t already do that for you… Then, in 6 simple steps, we will guide you through sizing and repairing your tip top to be good as new!
Remove the Old Tip Top to Start
Sometimes you don’t lose the tip of the rod or the tip top, and rather you lose only the insert ring. No problem!
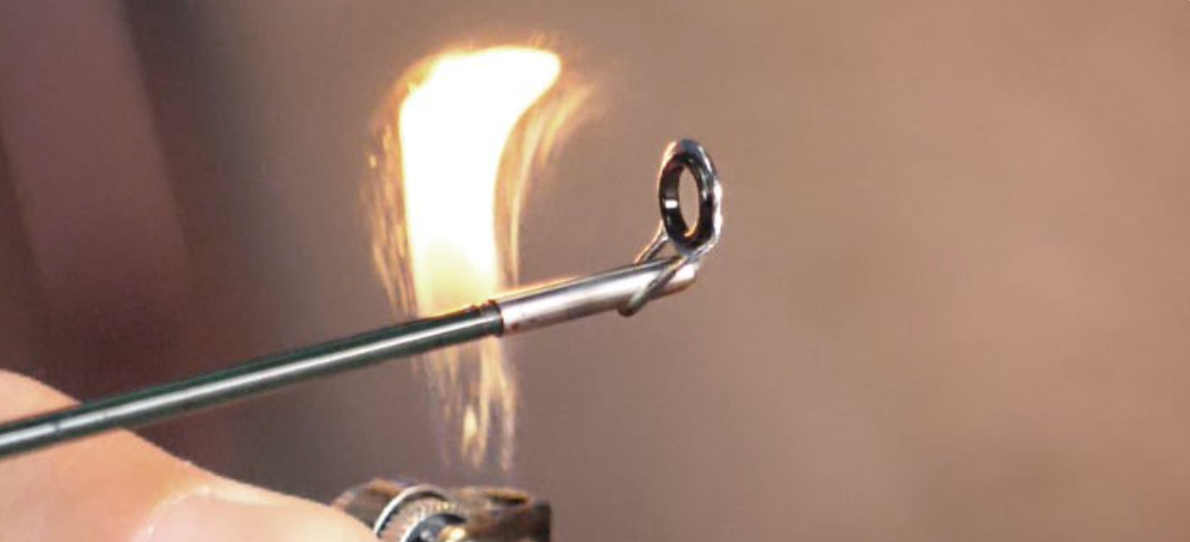
Easy when done correctly, remove your tip top by whisking a small flame, such as a lighter or candle, back and forth under the tube of the tip top.

Through a gentle heat, the tip top adhesive will melt then release from the rod blank, but remember to never twist it off. Pulling the tip top straight off of the blank will help avoid any additional complications.

The remaining steps will take you from a bare rod tip to being back on the water with a tip top and ready to fish.

1. Identify the Tip-Top Style
Generally, tip-tops range from spinning and casting tops to fly and boat tops.

Different tip-tops are made for each fishing application, double check to make sure you chose the right design when ordering the replacement.
Don’t worry, we have them ALL!
2. Measure the Ring & Tube Size
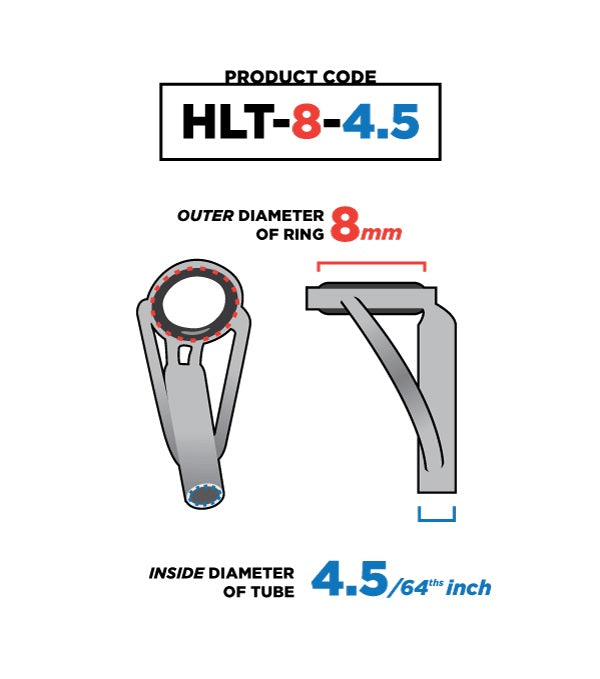
Measured in millimeters, the ring size can either be determined by the outside diameter (OD) of the ring, also known as the eyelet, or the inside diameter (ID) of the tip-tops metal frame that holds the ring. Standard ring sizes for conventional rods are 6, 8, and 10 millimeters.
For heavier fishing applications like saltwater rods, ring sizes can get as big as 16mm.
Considering both methods will give you the same measurement, it is primarily a matter of what you have available to measure. For instance, if you lost the entire tip-top then you can usually measure the ring size of the smallest guide and that will be an equal measurement.
Finding the tube size is dependent on either the inside diameter (ID) of the tip-top tube or the outside diameter (OD) of the blank’s tip. Tube sizes can get a bit more obscure because they are measured through a fraction and unlike ring sizes, the fraction is in inches instead of millimeters.
To make things interesting, the tube size is represented by 64ths of an inch.
The tube measurement you see when purchasing a tip-top is actually the numerator over 64ths of an inch. For example, common tube sizes range from 3.5 to 12, but remember this actually means they range from 3.5/64ths to 12/64ths of an inch.
Want a great tool to help measure tip tops and guides in seconds? Try the CRB Tip Top and Guide Sizing Gauge!

When using the gauge, make sure you put the tip of the rod through the hole about the same depth as the length of the tip top tube.
Check out the image below for an example:

Whether you’re looking for the ring size, tube size, or guide measurements – it will be hard to find a resource as helpful as this gauge.

Not only will tip top tubes fit onto the gauge’s pegs, but there are also pegs to size your guides too!
Once you have your tip top style and measurements, order your new tip top!
3. Heat Tip Adhesive, Schmear it, & Roll it
Next – open up your new tip top from Mud Hole, and take out your tip top adhesive and a lighter because its showtime.
Whisk the flame of the lighter over the end of the tip top adhesive and give it a few passes until it is visibly melting on the edge.

Now stay with us here… if you have a workshop table or a surface where you don’t eat dinner, use this method:
Schmear the melted end of the adhesive onto your surface like so.
 Give it one Mississippi to cool, and then quickly roll it up off the surface like well, a booger?

Continue to roll that adhesive until you’ve made a thin cylinder to fit inside the tube of your new tip top.
4. Stick into Tube & Melt Adhesive
Take that adhesive and stick it right into the tip top.

Then, get your lighter and waft the flame underneath the tube of the tip top. Don’t just hold the flame on the tip top or you will leave scorch marks.

These can usually be cleaned off, but it’s also easily avoidable to begin with.
As the adhesive starts to melt again, quickly move on to the next step.
5. Twist Tip Top onto Rod Tip
Take the tip top and twist it down onto the rod tip.

Make sure you rod tip runs all the way into the tube of the tip top. If there is room on the inside of the tube between the rod tip and the tip top it could lead to another failure even after the adhesive cures.
6. Align Tip Top with Running Guides
Before the adhesive hardens, make sure you twist the tip top to align it with your running guides.

Once aligned, let the adhesive cure for a minute or two and you’re ready to get back to fishing!
Check out Tip Top Repair Kits
When you’re on the water, you can’t exactly get a new tip top shipped to you in that moment. But instead, you can order our Tip Top Repair Kits!
Order your repair kit based on the insert ring size if necessary, and the application styles. Each kit is sorted by application and includes 5 tip tops with realistic tube sizes in the increments that make sense for your rods.
For instance, most spinning and casting tip top tube sizes will range from 4.5 to 6.5 – meaning that particular kit would include: a 4.5, a 5.0, a 5.5, a 6.0, and a 6.5 inside.

These kits also include Tip Top Cement for a sturdy bond on every rod tip.
Having multiple tube sizes available like this allows you to make speedy repairs on the water, so you can catch more fish and avoid wasting any time on worrying!
