Learn 4 simple steps for setting up a rapid reduction guide layout on your custom fishing rod.
How to Assemble Rapid Reduction with K-Guides
While this guide concept works best with braid, rapid reduction isn’t as hard a concept as many rod builders assume.
The basic rod building principle behind rapid reduction layouts is that it brings the best of the micro movement and new guide concepts to dramatically improve performance. Boosting casting distance and accuracy while also increasing the rod’s overall performance, the rapid reduction layout brings serious benefits to your fishing.
In order to layout K-Guides or High Frame Guides as they are often referred, for the most efficient performance, it’s important to follow these instructions.
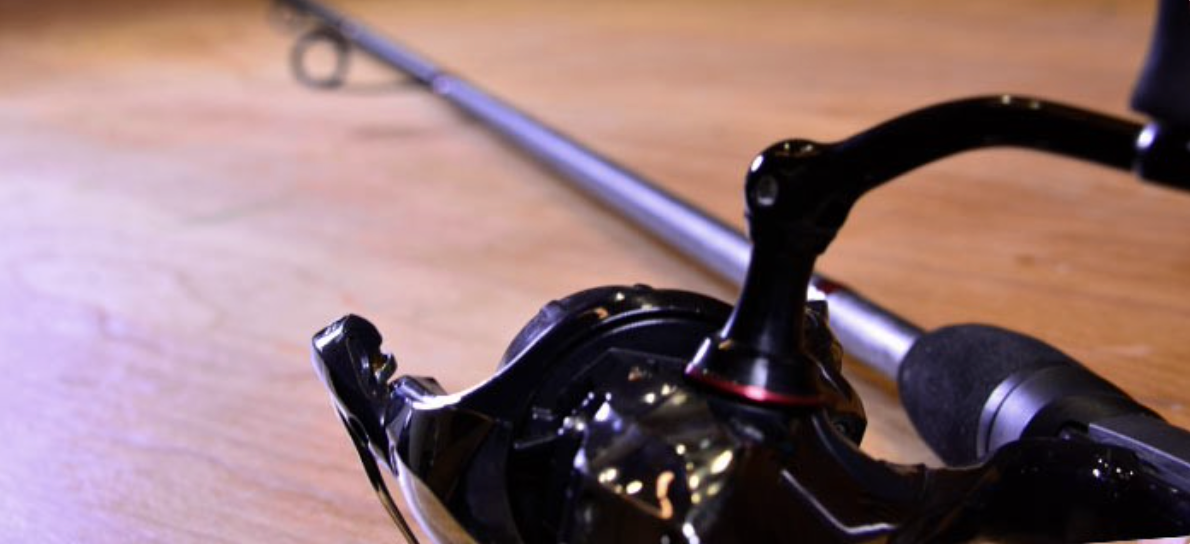
1. Position Reel and Reel Seat First
Unlike other guide concepts, organizing K-Guides for rapid reduction requires the reel seat and reel to be in a fixed position.
Having your reel seat and reel in place is important because this is the only way to get true rapid reduction as the braid goes from the reel through the guides and out of the tip top.
For the most efficient rapid reduction layout, simply build up the handle and glue the reel seat in place. Once the epoxy glue has dried completely, attach the reel you want to use on this custom rod and move on to the next step.
2. Use Axle to Find Reel’s Center
With the reel seat and spinning reel firmly in place, remove the spool from the reel to reveal the spool’s axle. Since this axle is located at the center of the reel, we can use this point to assemble our rapid reduction guide train.
Place the rod on the table with the spool’s axle aligned on the table’s edge, then take a step back and look at the blank instead. Make sure the angle of the spool’s axle coordinates with the edge of the table and the point where the blank crosses the edge of the table will be the choke point.

The choke point is crucial to assembling the rapid reduction guide layout and we will return to it shortly.
3. Set Up Reduction Train From Stripper to Choke Point
Now depending on the test of the braid, you will start off the guides with a stripper guide of either size 16, 20, or 25. For example, any braid up to 10 lb. will use a size 16 stripper, braid up to 20 lb. will use a size 20 stripper, and above 20 lb. braid will use size 25.
Once you know what size stripper is right for you, place it on the rod blank with some guide tubing so that the upper edge of the guide frame is on the edge of the table.

Then with the stripper in place, place the choke guide on the blank with guide tubing at the point where the blank crosses the edge of the table. The choke guide marks where the braid will transition from reduction guides to the remaining running guides, so it will be much smaller.

With these crucial guides in place, there will be room in between to add more reduction guides. The second stripper guide should be exactly half the size of the first stripper guide for the reduction to work correctly.
The second stripper and any guides before the choke guide should also have the upper edge resting along the edge of the table. This layout complements the angle of the reel in order for braid to pass through with the most efficient reduction setup possible.

Since braid is softer and has less memory, the smaller sizes of the first two stripper guides actually pull braid through as straight as possible by encompassing the braid and limiting its oscillation as it travels between guides.
Remember, guide tubing is a great asset for spacing your rapid reduction layout because you can easily shift the guides while also knowing each guide foot is secure in position. For precise guide placement on tapered blanks, guide tubing is available in various sizes for different diameters as well as in CRB Micro Guide Bands for the smallest of guide feet.
When you have the reduction train established with the top edge of each stripper guide on the edge of the table and the edge of the table running through the center of your choke guide, you are ready to get wrapping.
4. Wrap K-Guides and Apply Epoxy
In the beginning of the thread wrap, start about 1/4 inch or so (this distance is personal preference) from the guide, and set up your hand wrapper to wrap left to right.

Wrap the thread once around the blank and on the second wrap around, carefully place your finger on the blank where the two threads meet.

Holding those threads in place, slowly rotate the rod to simultaneously cross the running thread over the tag end that you started with. Basically, you are cross-stitching an X pattern to lock the tng thread in place.

After approximately eight wraps, stop and trim the remaining length of the tag end off as close to the wraps as possible.

To trim the thread flush to the wrap, lay a razor blade flat against the wrap with the blade facing the tag end and pull the tag end over the razor blade.

Note: If you are new to thread wraps, do some practice wraps before executing the real thing for better finished results.
Continue wrapping while constantly monitoring that each wrap is tightly seated next to the previous wrap. Use a burnishing tool to keep wraps tight and neatly packed together.
Next be cautious as you wrap the transition from rod blank up onto the guide foot. This is where it is easy to make the mistake of allowing the threads to sit on top of each other rather than next to each other.

When you get about 1/8 inch from the end, take a small piece of thread and fold it over into a simple loop. Slide the loop under the running thread (the loop goes in the same direction you are wrapping), making sure it’s tight to your wrap.

Complete your wrap over the loop, about five times.

Then, put one finger on the top of the wrap, and use your other hand to cut the running thread from the spool.

After cutting the thread from the spool, grab the tag end you just created and slip it through the loop.

Gently pull the loop back through the wraps until both the loop and the tag end of your thread come through.

Finally, grab your razor blade and trim the tag end in the same manner as the initial tag end and the wrap is done.

Apply ProKöte Epoxy Finish
After the wraps are complete, apply the two-part epoxy finish ProKöte for crystal clear wraps that last. Once the epoxy cures for a full 24 hours, you’ll be ready to experience the incredible performance of a true rapid reduction guide layout.

And even better, you did it yourself!
Don’t forget to pick up all your K-Guide Kits and Finishing Essentials at Mud Hole…